
Founded in 1983, IMSI is a leader in feature-rich, yet affordable, general-purpose CAD (Computer Aided Design) and home design desktop software, and a pioneer in mobile solutions for the AEC (Architectural, Engineering, and Construction) industry.
IMSI Design is a maker of CAD (Computer-Aided Design) and home design software for Windows and Mac, as well as mobile solutions for the AEC (Architectural, Engineering, and Construction) industry.
A well-organized kitchen is essential for creating a modern and stylish home. When items are properly arranged and clutter is reduced, the kitchen feels more open, calm, and visually appealing. Modern kitchen organization focuses on simplicity, functionality, and clean design, helping the space look elegant while remaining practical for everyday use.
Minimalism plays a key role in achieving a modern kitchen look. Keeping countertops clear and storing unnecessary items inside cabinets instantly improves the appearance of the space. Smart storage solutions such as drawer dividers, pull-out shelves, and organized cabinets make it easier to access kitchen essentials while maintaining a neat and seamless design.
Using coordinated storage, neutral colors, and proper lighting further enhances the modern feel of the kitchen. Matching containers, labeled jars, and consistent materials create visual harmony, while good lighting highlights clean surfaces and organized areas. With thoughtful planning and organization, any kitchen can be transformed into a clean, modern, and functional space.
For example, we began with a basic kitchen layout that had no essential equipment. There were no oven, sink, refrigerator, or built-in appliances, giving us a blank space to design and organize from scratch.
Now, step by step, we will transform our kitchen into a modern space after installing all the essential kitchen equipment.
First, we will place the base cabinet. To do this, click on the Cabinet icon in the Floor menu.
After clicking the Cabinet icon, the cabinet-related options will appear on the right side. Simply click the Cabinet Type drop-down icon to explore the available options.
After clicking on the cabinet type, you will see a list of cabinet options—choose the one that best suits your kitchen space and design.
Range Cabinet Collection for the Kitchen
After selecting a cabinet for your kitchen, it will appear in the area where you place it.
Now it’s time to place the range hood above the cooking range. To do this, go to Display Stock Library Items > Kitchen and Dining > Appliances > Range Hoods.
Range Hoods Collection for the Kitchen
In the same way, we can place an oven in our kitchen. For this, go to Display Stock Library Items > Kitchen and Dining > Appliances > Ranges and Ovens.
Range and Oven Collection for the Kitchen
A modern kitchen is incomplete without a refrigerator. To place one, go to Display Stock Library Items > Kitchen and Dining > Appliances > Refrigerators.
Kitchen Refrigerator Collection for the Kitchen
Now, to place a cabinet oven in your kitchen, first go to the Cabinet option in the Floor menu.
After clicking on the cabinet type, a list of cabinet ovens will appear—choose the one that best fits your kitchen space and design.
Cabinet Oven Collection for the Kitchen
Lighting is essential in a modern kitchen. To add modern lights, go to Display Stock Library Items > Lighting > Hanging.
Kitchen Hanging Light Collection for the Kitchen
A modern kitchen is incomplete without a stylish sink. To place one, go to Display Stock Library Items > Kitchen and Dining > Sinks.
Kitchen Sink Collection for the Kitchen
Furniture is also an important element in a modern kitchen. To add modern pieces like chairs, go to Display Stock Library Items > Kitchen and Dining > Tables and Chairs > Chairs.
Kitchen Chairs Collection for the Kitchen
Adding a carpet can enhance the appeal of your kitchen. To place one, go to Display Stock Library Items > Decoration > Karastan Rugs.
More Designs of Carpets for the Kitchen
Fancy wall lights also play an important role in giving a modern look to your kitchen. To place them, go to Display Stock Library Items > Lighting > Sconce and Wall.
Wall Light Collection for the Kitchen
Similarly, framed images on the walls contribute to a modern kitchen look. To place them, go to Display Stock Library Items > Decoration > Mirrors, Shelves, and Frames.
Framed Image collection for the Kitchen
A kitchen feels incomplete without a flower pot. This app offers a wide range of flowers with pots, but if none meet your needs, you can place an empty pot and add flowers later. To place a pot in your kitchen, go to Plants > Display Stock Library Items > Container and Potted Plants > Pots and Containers.
Pot and Container collection for the Kitchen
Now it’s time to add flowers to the pot. To do this, go to Plants > Display Stock Library Items > Annuals.
Pot Flower collection for the Kitchen
After placing all the equipment in the kitchen, you need to render it to see the final results.
Before adding equipment, the look of the Kitchen
After adding equipment, the look of the Kitchen
Designing a kitchen using the right tools and essential elements makes the entire process creative, flexible, and enjoyable. From selecting cabinets, countertops, appliances, doors, and windows to adding lighting, backsplashes, and smart storage solutions, each detail plays an important role in creating a functional and attractive kitchen. The use of default and downloaded libraries offers a wide range of design options, making it easy to customize the space to suit personal preferences. The final rendered view clearly demonstrates how thoughtful choices and proper placement can transform a kitchen into a well-organized, stylish, and welcoming space.
Now it’s your turn: to redesign your kitchen and enjoy the results every day.
Perfect placement of bathroom accessories is a defining element in creating a beautiful, luxurious, and well-organized bathroom. When accessories such as towel holders, soap dispensers, shelves, robe hooks, and mirrors are positioned with thoughtful planning, they enhance both functionality and visual appeal. Proper height placement and balanced spacing ensure ease of use while preventing clutter, allowing the bathroom to feel open, refined, and comfortable for everyday use.
Each accessory should complement the overall design theme and align seamlessly with the vanity, sanitary fittings, and finishes. Well-placed mirrors enhance both natural and artificial lighting, making the space appear brighter and more spacious. Coordinated wall accessories contribute to a clean, polished look while adding subtle elegance and practicality to the bathroom layout.
Attention to detail in accessory placement elevates the overall ambiance of the space. A well-arranged bathroom not only improves convenience and safety but also creates a calm, sophisticated environment. With harmonious positioning and refined design choices, bathroom accessories transform the space into an inviting retreat that reflects timeless style and thoughtful craftsmanship.
For example, we started with a basic bathroom without ceiling lighting or thoughtfully placed accessories, which limited its ability to feel attractive, welcoming, or well-designed.
Now it’s time to enhance our bathroom space and make it more attractive and visually appealing by thoughtfully incorporating essential fittings, lighting, and accessories. To do this, we will use both the default libraries and the downloaded libraries.
Where can the downloaded libraries be found?
You can find the downloaded library items under Display Downloaded Library Items. To do this, first launch the application and then click on the highlighted icon.
After that, click on Accessories and then select Display Downloaded Library Items.
In the Display Downloaded Library Items, you will find many Bathtubs for your bathroom. You can choose any one of them based on your Bathroom’s design and layout. You may find Bathtubs under Display Downloaded Library Items > Bath > Bathtubs
Bathtub Collection for the Bathroom
In same way in the Display Downloaded Library Items, you will find many Bath Lights for your bathroom. You can choose any one of them based on your Bathroom’s design and layout. You may find Bath Light under Display Downloaded Library Items > Bath > Lighting
Wall Light Collection for the Bathroom
Wall accessories play a vital role in the overall appearance of the Bathroom. To enhance your space, choose mirrors, shelves, and frames from the Display Downloaded Library Items. You may find Bath wall accessories under Display Downloaded Library Items > Inferior Décor > Decoration > Mirrors, Shelves and Frames
Wall Accessories Collection for the Bathroom
This application offers a wide variety of bidet toilet, and you can choose any one according to your preference for your Bathroom. If you later decide to change the bidet toilet, simply click on the added bidet toilet, and you will see different bidet toilet displayed on the right side. You may find Bidet toilet under Plumbing menu after clicking on Toilet.
More Bidet Toilet Designs for the Bathroom
Similarly, this application offers a wide variety of Vanities, and you can choose any one according to your preference for your Bathroom. You may find Vanities under Display Stock Library Items > Bathroom > Vanities and Furniture
More Bathroom Vanity Designs
In the Display Downloaded Library Items, you will find many Mirrors for your bathroom. You can choose any one of them based on your Bathroom’s design and layout. You may find Bathroom mirrors under Display Downloaded Library Items > Interior Decore > Decoration > Mirrors, Shelves and Frames
More Bathroom Mirror Designs
Bathroom ceiling lights play a vital role in the overall appearance of the Bathroom and without these a bathroom is incomplete. You may find Bathroom ceiling lights under Display Downloaded Library Items > Inferior Décor > Lighting > Ceiling
Ceiling Light Designs for the Bathroom
After placing Vanity, Bathtub, Mirror, Wall accessories, Decoration pieces and bidet toilet, you will need to render it to see the final results.
Bathroom Appearance Without Accessories
Bathroom Appearance After Accessory Placement
Designing a bathroom using the right tools and fixtures makes the entire process creative, flexible, and rewarding. From selecting sanitary fittings such as washbasins, toilets, bathtubs, and showers to choosing tiles, cabinets, mirrors, lighting, and storage units, each element plays a vital role in creating a clean, functional, and visually appealing bathroom. The use of default and downloaded libraries offers a wide range of design options, making it easy to customize the space according to personal style and practical needs. The final rendered view clearly demonstrates how careful selection and proper placement of fixtures and accessories can transform a simple bathroom into a well-organized, modern, and relaxing space.
Now it’s your turn: to redesign your bathroom and enjoy the comfort, elegance, and functionality of your design every day.
Sheet Metal tools in the application offer a comprehensive set of features for designing and editing sheet metal parts with precision and control. These tools allow users to create intricate geometries, such as tabs, bends, flanges, and hems, while preserving material integrity and adhering to key sheet metal design parameters like bend radius and k-factor. Whether designing structural components, mechanical enclosures, or decorative parts, the Sheet Metal tools simplify the entire workflow from initial design to flat pattern generation. The Sheet Metal toolset is located in the Tools menu. There are six primary Sheet Metal tools available: Tab, Bend, Contour Flange, Flange, Single Hem and Unbend.
Sheet Metal Part Example
The Tab feature creates a flat, protruding extension from a sheet metal part with precision and control. A tab is typically a planar section that remains in the same plane as the base sheet or flange it extends from. It can take various shapes: rectangular, trapezoidal, or custom profiles depending on the design requirements. Tabs often serve as the foundation for additional sheet metal features, providing a starting point for operations such as bends, flanges, or cuts. This tool is essential for building the initial geometry of a sheet metal component.
Open the Sheet Metal Tools palette from the Tools menu and select the Tab tool.
Tab tool in Sheet Metal Palette
Specify the sheet metal thickness according to the design requirements.
Specified the Thickness
Now select a closed profile to define the tab’s geometry. The tool automatically generates flat sheet metal section based on the defined parameters.
Flat sheet metal Tab generated based on defined parameters
Bend
The Bend feature is used to deform a flat sheet metal part into a curved or angled shape while maintaining material integrity. It is an essential tool for creating functional components such as brackets, enclosures, and ducts. By controlling parameters like bend angle, radius, and direction, it ensures accuracy and consistency in the design process.
Open the Sheet Metal Tools palette from the Tools menu and select the Bend tool.
Bend tool in Sheet Metal Palette
Specify the Bend Radius and enter the desired Bend Angle.
Specified the Bend Radius and Bend Angle
Select the entity and define the bend axis by selecting two points on the face to bend.
(Optional) Press the Option key to flip the bend direction.
Sheet metal part after applying the Bend tool
Contour Flange
The Contour Flange feature allows the creation of a sheet metal flange by extruding a sketch profile along a defined path. The profile can include various geometric entities such as lines, arcs, splines, or elliptical arcs. Sharp corners within the profile automatically generate bends that follow the specified bend radius, ensuring smooth transitions and accurate sheet metal behavior.
Open the Sheet Metal Tools palette from the Tools menu and select the Contour Flange tool.
Contour Flange tool in Sheet Metal Palette
Draw a profile for the Contour Flange tool.
2D profile sketch created for the Contour Flange tool
Specify the Distance, Thickness, and Bend Radius in the fields displayed in the Prompt window.
Parameters specified for Contour Flange creation
Select the drawn entity, then choose two points to define the extrusion direction for the Contour Flange.
Resulting Contour Flange after applying the tool
Flange
The Flange feature adds a straight, planar extension or lip to the edge of a sheet metal part. Flanges are commonly used to strengthen components, create mounting edges, or connect adjoining parts. The tool provides precise control over key parameters such as flange length, bend angle, and bend radius, allowing for accurate and consistent results in design and manufacturing.
There are two types of flanges available:
Open the Sheet Metal tools from the Tools menu and select the Flange Tool.
Flange tool in Sheet Metal Palette
Select the Full Edge option from the dropdown located in the Prompt window, and specify the Flange Length, Bend Radius, and Angle in the fields displayed in the Prompt window.
Parameters specified for Flange creation
Flange (Full Edge) after applying the tool
Now select the Partial Edge option from the dropdown located in the Prompt window, and specify the Flange Length, Bend Radius, and Angle in the fields displayed in the Prompt window.
Parameters specified for Flange creation
Flange (Partial Edge) after applying the tool
Single Hem
The Single Hem feature allows the edge of a sheet metal part to be folded back onto itself, forming a rounded or flattened lip. This operation enhances part strength, improves safety by eliminating sharp edges, and contributes to a cleaner appearance. Various hem types, such as teardrop, open, or closed can be applied depending on the design and functional requirements.
Open the Sheet Metal Tools palette from the Tools menu and select the Single Hem tool.
Single Hem tool in Sheet Metal Palette
Select the Straight option from the dropdown in the Prompt window, and enter the desired Length and Gap values in the corresponding fields.
Parameters specified for Single Hem (Straight) creation
Single Hem (Straight) after applying the tool
Now select the Rolled option from the dropdown in the Prompt window, and enter the desired Radius, Angle and Thickness values in the corresponding fields.
Parameters specified for Single Hem (Rolled) creation
Single Hem (Rolled) after applying the tool
Unbend
The Unbend tool is used to return a bent or curved section of a sheet metal part to a flat, planar state without changing its design. It reverses the deformation by selectively flattening bends or regions while maintaining material properties and adhering to established sheet metal parameters such as bend allowance.
The K-factor is a value that represents the position of the neutral axis, the line within the sheet metal that remains unstretched and uncompressed during bending, relative to the material thickness. It is a dimensionless number, typically ranging from 0.3 to 0.5 for most materials and bend conditions, though it can vary between 0 and 1 depending on factors like material type, thickness, and bend radius. The K-factor is essential for calculating the bend allowance, which helps determine the accurate flat pattern length before bending. In practice, it ensures precise fabrication by accounting for how the material behaves during the bending process.
Open the Sheet Metal Tools palette from the Tools menu and select the Unbend tool.
Unbend tool in Sheet Metal Palette
Set the K-Factor value for accurate unbending, and select the solid part to flatten.
Unbend after applying the tool
The Sheet Metal tools in the application simplify the entire sheet metal design process from creating tabs and bends to applying hems and unbends. With precise control over parameters like bend radius and K-factor, these tools ensure accuracy and efficiency. They provide a seamless workflow for producing high-quality, ready-to-manufacture designs.
Redesigning a living space is more than just changing furniture or colours - it is about creating an environment that feels elegant, attractive, and welcoming at the same time. With the right balance of colours, lighting, textures, and décor, any room can be transformed into a space that reflects style, comfort, and personality. Small, thoughtful design choices often make the biggest impact, proving that elegance does not always require a large budget. A well-designed living space not only enhances the beauty of a home but also improves the way people relax, connect, and enjoy everyday moments.
In a living space, there are many elements to consider, such as the sofa, table, curtains, door and window designs, carpet, wall décor accessories, modular media storage, and floor lighting. Choosing the right items for your living room can make it look more attractive and well-designed.
When it comes to selecting the right objects for your living room, you can find many options in the default item library as well as in the downloaded library items. If you want even more choices, you may need to purchase additional power packs for this application.
For example, we started with a basic living space that didn’t have any furniture or décor.
Now it’s time to make our living space more attractive and visually appealing. To do this, we will use both the default libraries and the downloaded libraries.
Where we can find downloaded libraries?
You can find the downloaded library items under Display Downloaded Library Items. To do this, first launch the application and then click on the highlighted icon.
After that, click on Accessories and then select Display Downloaded Library Items.
In the Display Downloaded Library Items, you will find many Modular Media Storage options for your LED TV. You can choose any one of them based on your living room’s design and layout.
Modular Media Storage Designs for Living room
This application offers a wide variety of window designs, and you can choose any one according to your preference for your living room. If you later decide to change the window design, simply click on the added window, and you will see different design options displayed on the right-hand side.
Window Designs for Living room
Similarly, this application offers a wide variety of door designs. You can choose any one according to your preference for your living room. If you decide to change the door design later, simply click on the added door, and the available options will appear on the right-hand side.
When you click on the drop-down icon, the different door designs will appear on the right-hand side.
Door Designs for Living room
Wall accessories play a vital role in the overall appearance of the living room. To enhance your space, choose mirrors, shelves, and frames from the Display Downloaded Library Items.
Wall accessories collection for Living room
Similarly, floor décor pieces greatly enhance the overall look of the living room. To add them, select Floor under Lighting in the Interior Décor section from the Display Downloaded Library Items.
Floor décor pieces collection for Living room
A living room feels incomplete without a carpet. To add one, choose Karastan Rung under Décoration in the default installed items.
More Designs of Carpets for Living room
If you want to add furniture, such as a sofa suite, to your living room, this application offers a wide variety of designs. You can find them under Interior Furniture in the Living Room section after selecting Display Downloaded Library Items.
More Designs of Sofa set
Similarly, if you want to add a table to your living room, there are many table designs available in this application. You can find them under the Interior Furniture collection in Oldhedge after selecting Display Downloaded Library Items.
More Designs of Tables for Living room
After placing all the accessories in the living room, you will need to render it to see the final results.
Before renovating the look of the Living room
After renovating the look of the Living room
Designing a living space using the right tools and décorative elements makes the entire process creative, flexible, and enjoyable. From selecting furniture, carpets, doors, and windows to adding wall accessories, lighting, and modular storage, each element plays an important role in creating an elegant and attractive living area. The use of default and downloaded libraries provides a wide range of design options, making it easier to customise the space according to personal preferences. The final rendered view clearly shows how thoughtful selection and proper placement of accessories can completely transform a living space into a well-balanced, stylish, and welcoming environment.
Now it’s your turn: to redesign your space and enjoy the beauty of your efforts every day.
The Arc Slot Polygon Tool allows you to create precise arc-shaped slots for adjustable mounting brackets, curved hinge mechanisms, ventilation louvers, and decorative grill patterns. This feature makes it easy to design both functional and decorative elements that require smooth, curved slots.
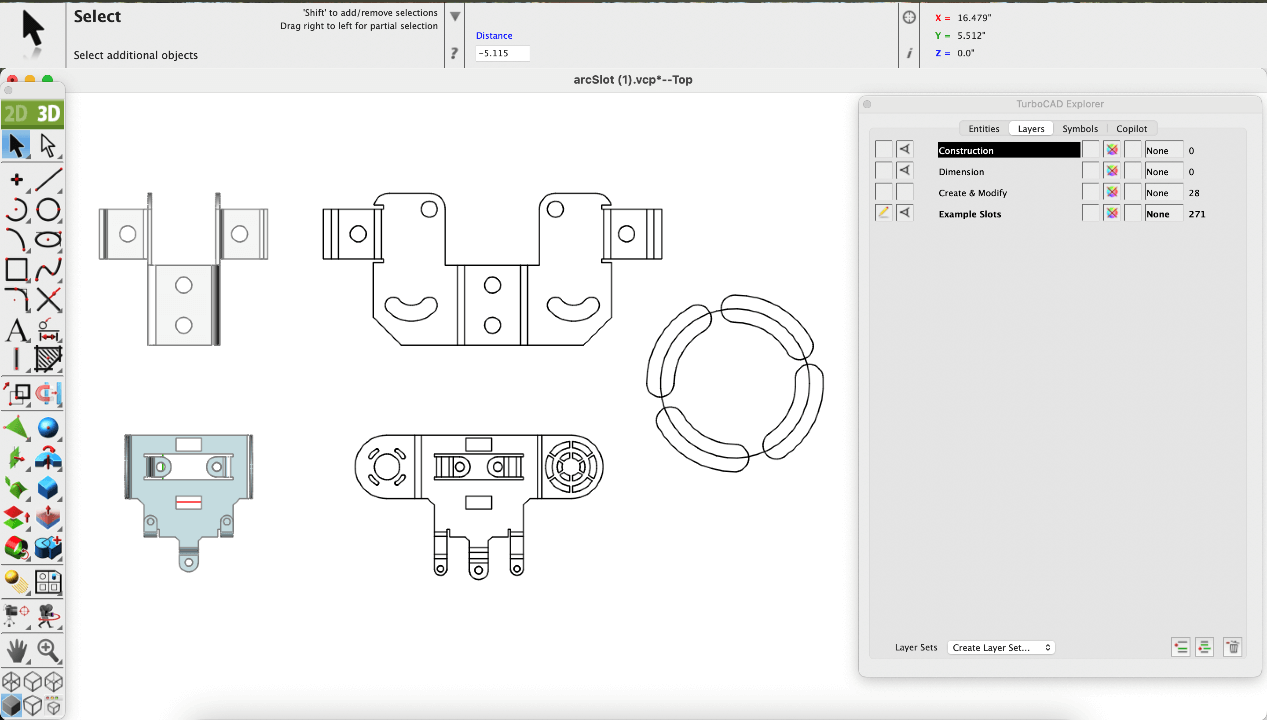
Arc Slot Polygon Tool workspace
The tool is located in the Polygon Tool Palette, as the last tool icon on the right. With just a click, you can begin creating arc slots directly in the design workspace.
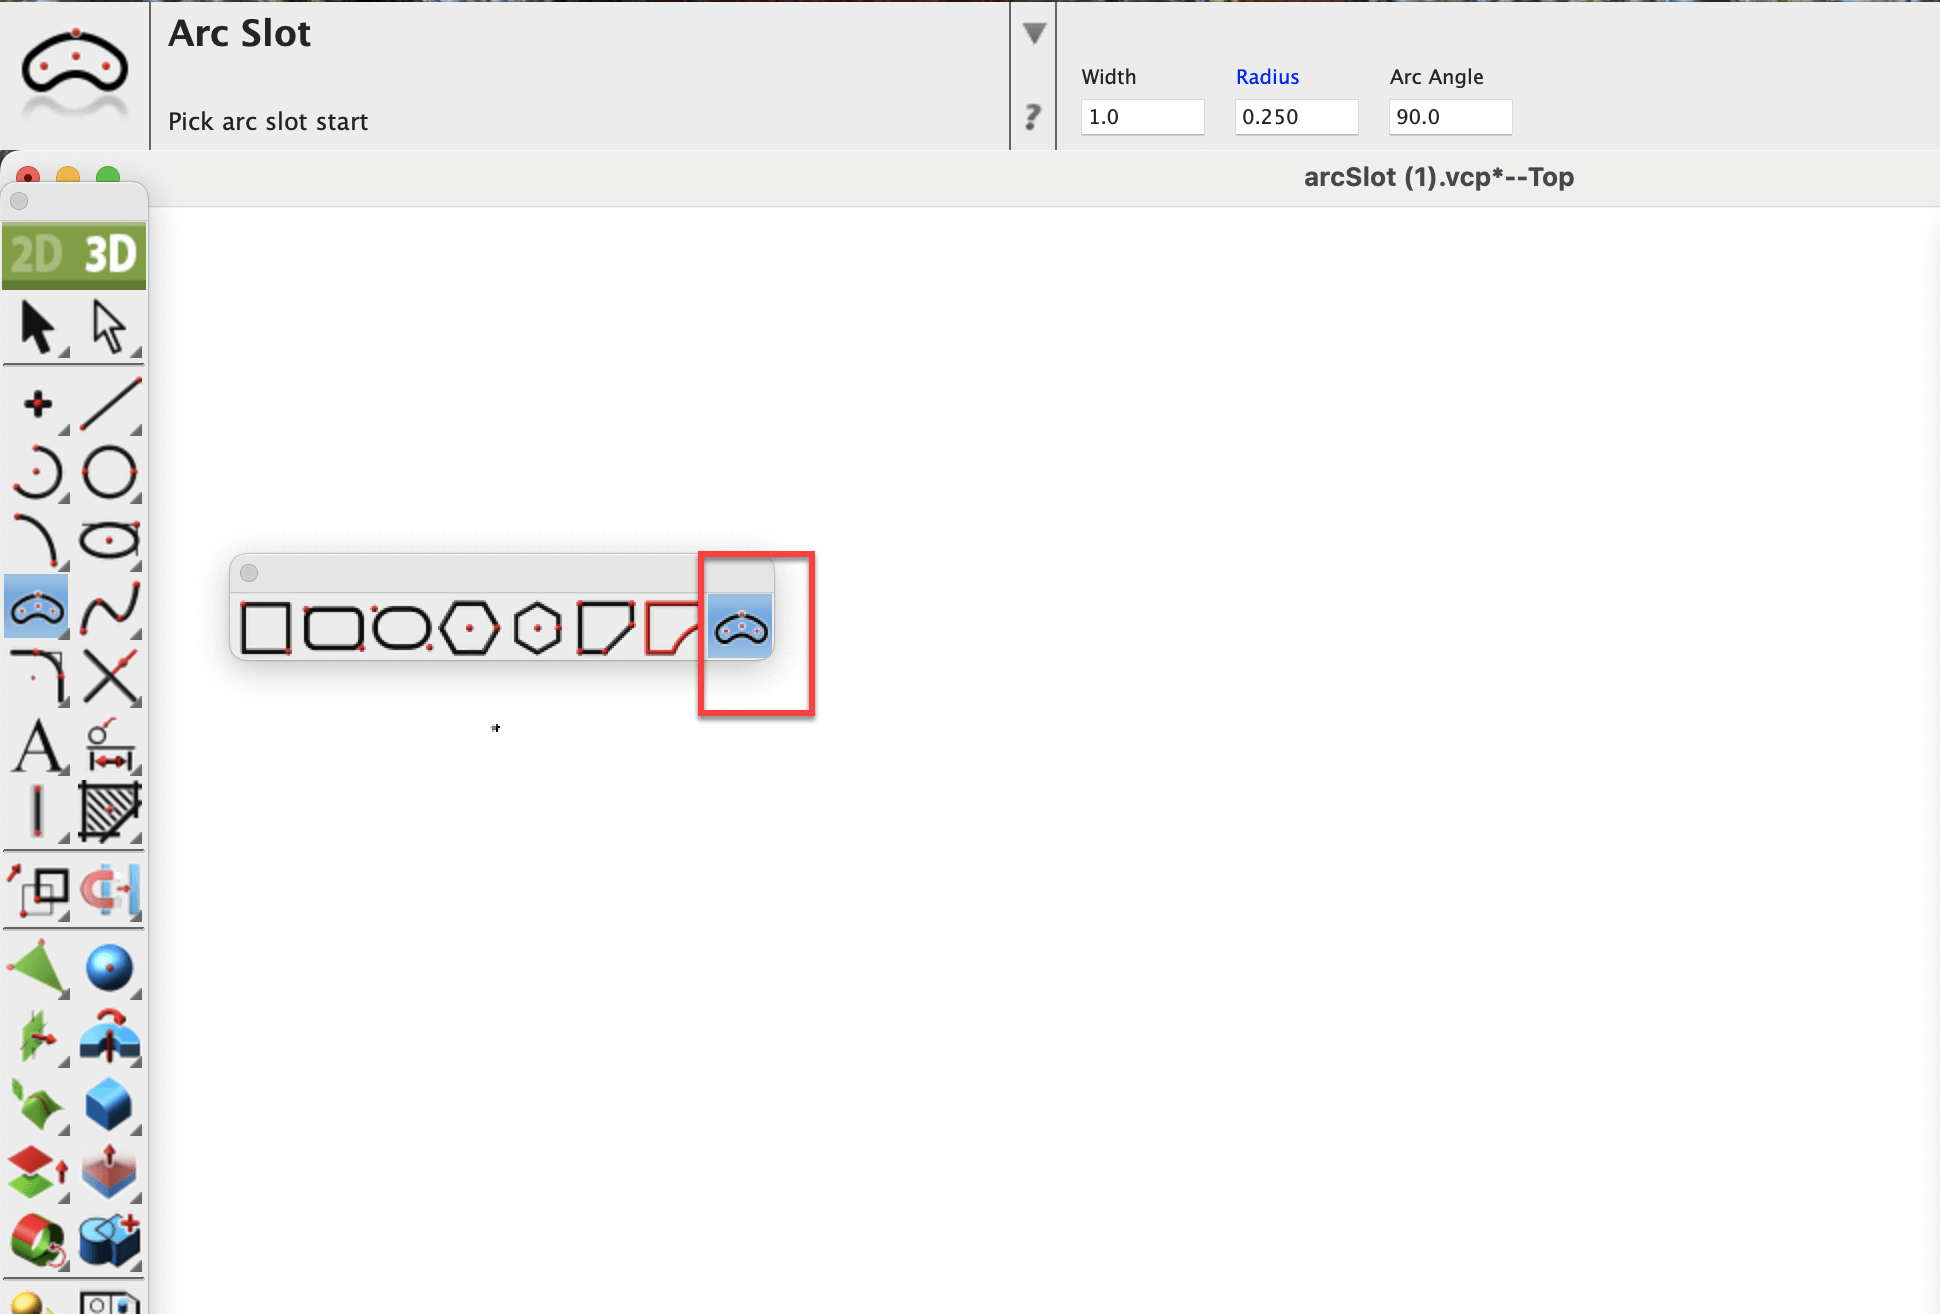
Polygon Tool Palette location
To create an arc slot, simply set a start point, an end point, a point on the middle of the arc, and then define the width of the arc. The slot is drawn automatically, giving you a clean and accurate curved shape.
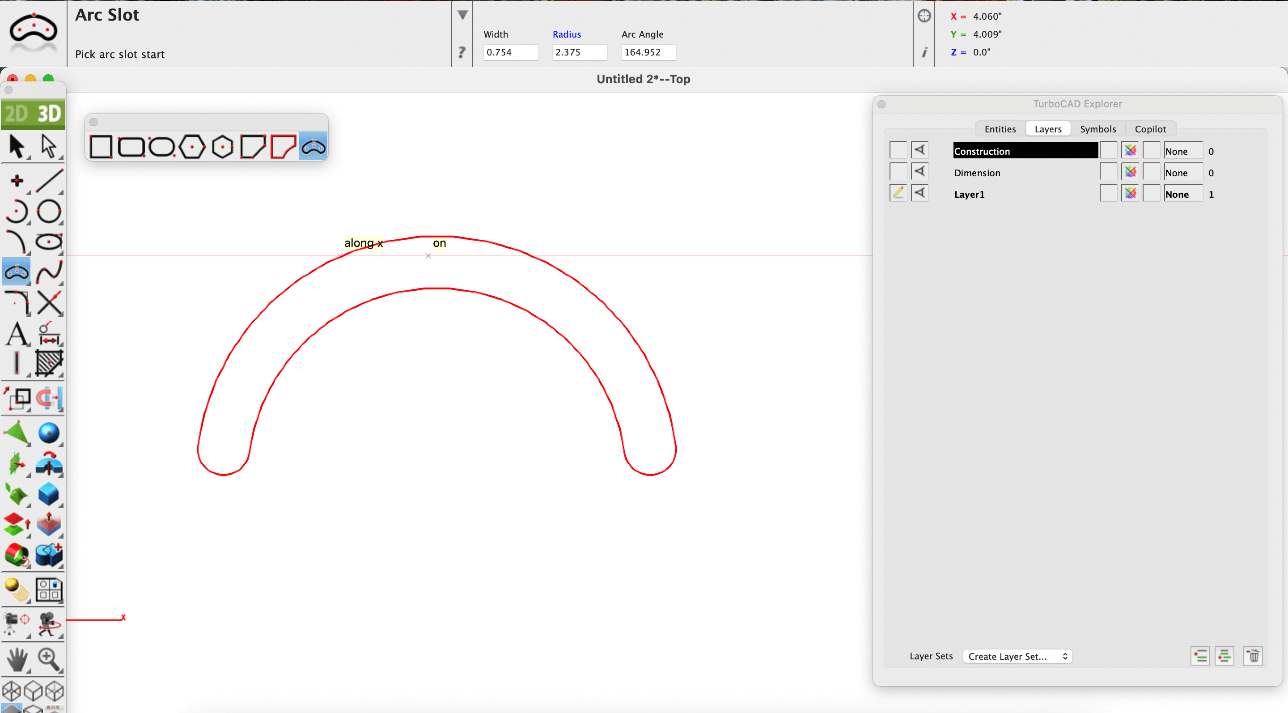
Creating an Arc Slot
Once created, the slot can be further adjusted. By using the Edit tool, you can see and move the points that define the slot into new positions. This makes it easy to refine your design without starting over.
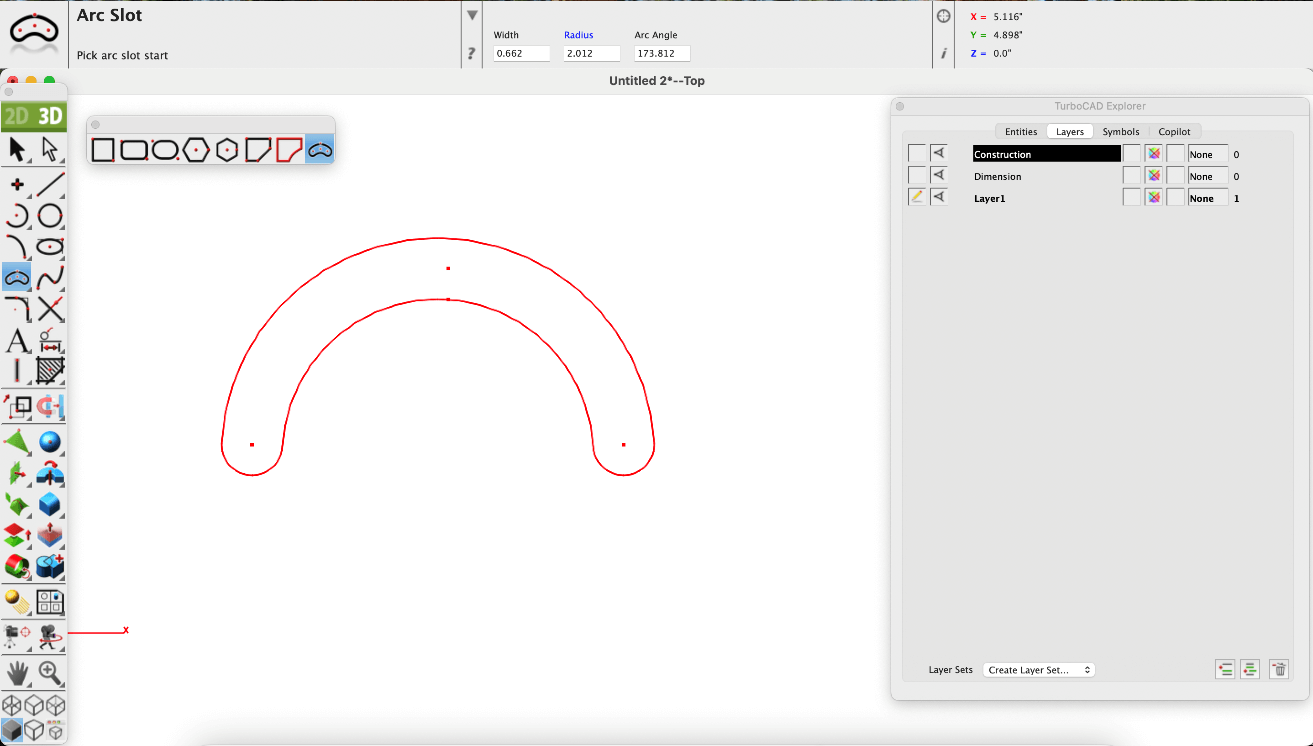
Editing the Arc Slot Polygon
You can also adjust the slot numerically using the Data Entry window. Here, the width and arc angle can be modified precisely. For example, you might change the arc angle to 150 degrees, instantly changing the shape of your slot.
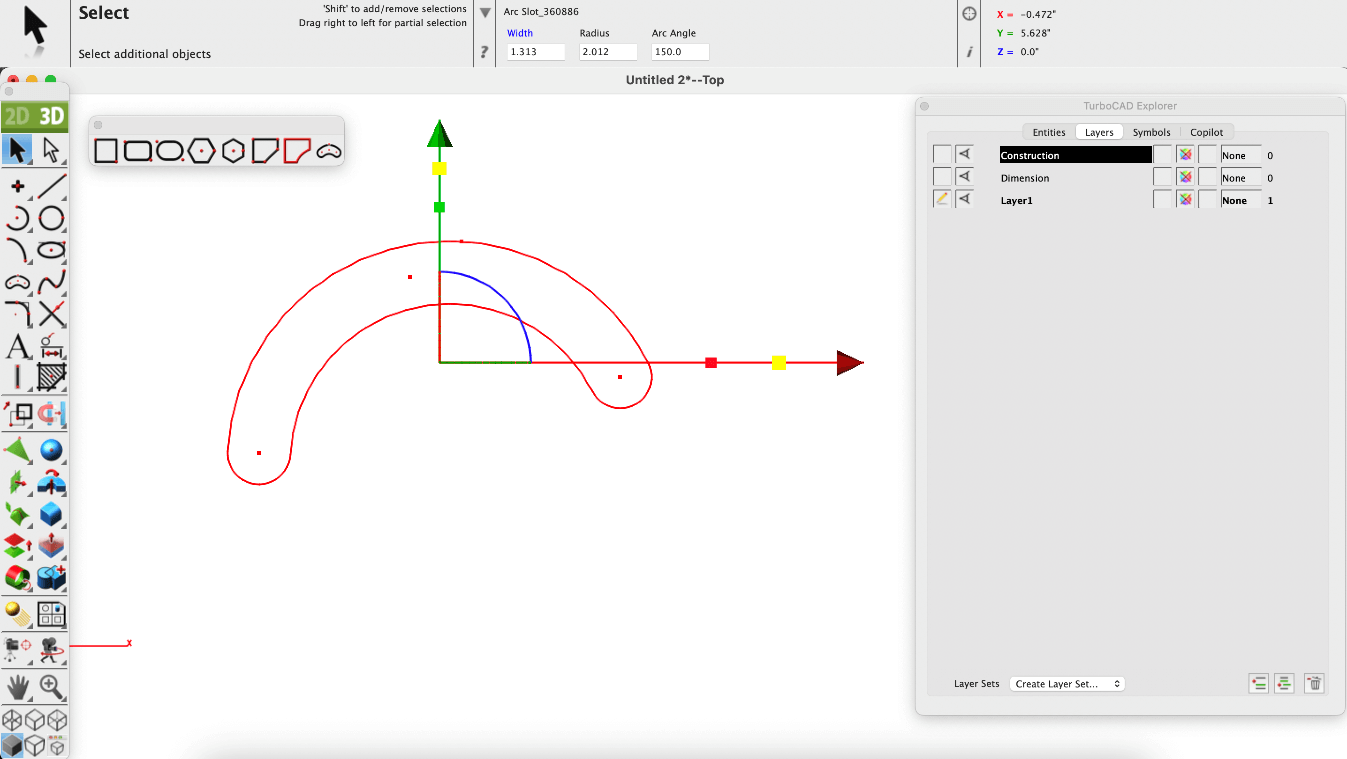
Adjusting parameters using Data Entry window
Whether you're designing for mechanical precision or visual impact, the Arc Slot Polygon Tool gives you the control and flexibility to bring your ideas to life. With intuitive controls and powerful editing options, it's a must-have for any designer working with curved slot features.

Founded in 1983, IMSI is a leader in feature-rich, yet affordable, general-purpose CAD (Computer Aided Design) and home design desktop software, and a pioneer in mobile solutions for the AEC (Architectural, Engineering, and Construction) industry.